Shipping Big Auto Parts Cheaply
November 11, 2018 | Posted in Helpful Tips, Shipping | By fastwrecks
One of the curses of dealing with shipping automotive parts is that some of the parts are really big. A lot of them, however, don’t weigh a lot. We often end up fighting the freight demon of dimensional weight. Let’s say you have a fender from a Toyota Supra. They are almost 6′ (2m) long, but don’t weigh a lot, even packaged. They weigh around 25 pounds (12kg.) If you try to ship this via USPS, UPS, or FedEx, especially long distances, you get penalized for the fact that it is bulky, but light.
We utilize two services that you may not be familiar with to ship these bigger, lighter, items. The first is offered is Greyhound Package Express (Busfreighter will soon be the new name.) GPX is ideal for bulky, somewhat light, items. You’re allowed up to 100# per piece, 82″*47″*29″. This allows you some serious flexibility in shipping things like fenders, hoods, car doors, etc. There are a couple of GOTCHA’s to watch out for. First, it is NOT a door to door service. You drop the package off at the bus station, your consignee has to pick it up at their bus station. The second is that NOT EVERY GREYHOUND LOCATION IS A GPX LOCATION. It is essential to verify before setting up your shipment that the receiving station accepts freight. Check the website. Finally, GPX does NOT INSURE AUTO PARTS FOR DAMAGE. Only for loss. Declare your full value, package it very securely, and pretend it’s going to be tossed around by college football players who don’t like you. We’ve only had a couple of issues with damage, but they do suck. Oh, and MAKE SURE YOU PROVIDE A GOOD PHONE NUMBER FOR THE RECIPIENT. They have 7 days to pick it up and then storage charges may start. Oh, by the way, you save a TON buying your label on the website. Like almost a 50% discount in most cases.
The other service we have used is Fastenal 3PL. 3PL is great for bigger, heavier parts. They handle your item on a pallet, and it moves like any other freight. You have to get a quote BEFORE shipping. The service delivers freight from Fastenal locaton to Fastenal location, and like GPX, is NOT door to door. You’re also at the mercy of their schedule and freight doesn’t always move to all locations all the time. You may have to be flexible in dropping it off a town or two away, and it is NOT an expedited service. That said, we’ve had very good service from them and the only issue we ever really had was a store employee trying to pull the “little lady” BS on me, which was quickly resolved by a call to my 3PL representative. One Gotcha. If you ship on a pallet without a box/crate around the item, it is NOT insurable. Not really a big deal for something like an engine or engine block. More of a big deal for a fiberglass Corvette hood.
So that’s a small summary of those two services. Both are “we’re going there anyway” services, and not the fastest, but the savings over traditional freight, UPS or FedEx can be SIGNIFICANT.
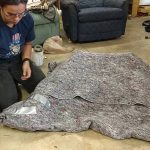
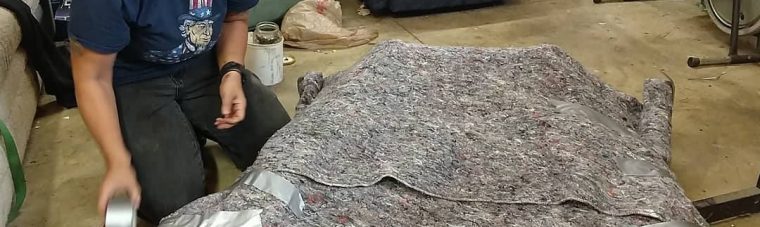
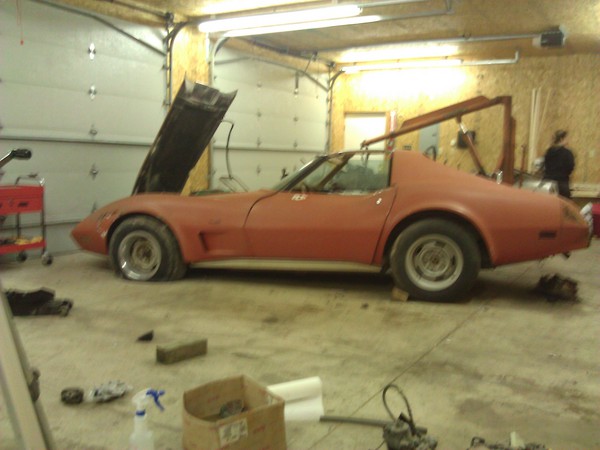
Speaking of UPS, one other tip that applied to them AND Greyhound. You do not HAVE to package your item. It must be safe to handle by drivers and not be a risk to other freight. But it is perfectly acceptable to ship tires, wheels, suspension parts and the like without a box. While a box/crate/pallet offers better protection, it is not always practical. This is a picture of a Toyota Supra subframe I packaged for transport via UPS (and I did the other subframe the same day to go via Greyhound.) I wrapped it in a moving blanket which I then securely taped around it and sent it on the way to our customer. It arrived safely and intact, as did the one sent via UPS.
I hope you find this useful, the quick takeaways are:
- Know the rules and limitations of the carrier you’re going to use.
- Understand that these services are NOT door to door delivery.
- Make sure that both you and the recipient are comfortable with the idea that it may take 2-4 weeks for the item to arrive.
- USE THE WEBSITES to get quotes, information, tracking and delivery times.
- Think outside the box.
Ciao for now!
Marisa Husvar
Owner of www.sportscarsalvage.us.
Mea culpa, posting frequency fail
November 6, 2018 | Posted in Helpful Tips, update | By fastwrecks
Good evening folks,
I have been really bad about posting on the blog here, but I am going to set a goal of doing better at that and getting at least one or two posts up a week. I have been loading our eBay store with parts in anticipation of the winter holiday selling season. We have Black Friday, Small Business Saturday, Cyber Monday… Ya know what, I’ll give you a great deal any time. Just ask! I have also just finished a ton of updates on our website. Check them out!
Look for some posts in the next few days. In the meantime, here is a video we did on DIY creation of custom keychains from diecast cars such as Matchbox and Hot Wheels.
All the best,
Marisa
New Season, New Domain Name for the store!

April 10, 2018 | Posted in Helpful Tips, update | By fastwrecks

We’ve always been proactive in making our stuff easy to find, but something escaped our attention… The link to our eBay store has always been http://stores.ebay.com/sportscarsalvage. Not horribly hard to find, but, well, long and not easy to remember. We’ve had an extra domain name sitting for quite some time, Fastwrecks.com, that we haven’t previously used. Today we set it up where that links directly to the store. So now to remember how to find us, simply type that in and you’ll head right to the store! We hope this makes it easier for you!
Happy Spring!
Marisa
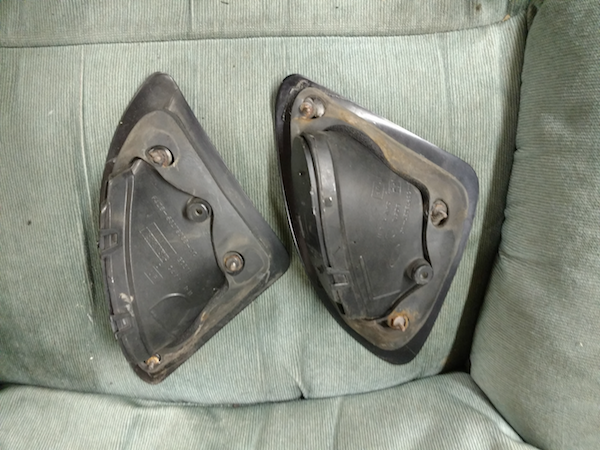
1994-1998 Ford Mustang Side Scoop Removal
November 11, 2017 | Posted in Helpful Tips, Mustangs | By fastwrecks
I was just asked how you correctly remove the external rear side vent scoops on a 1994-1998 Ford Mustang. They have threaded studs with nuts that must be removed from the INSIDE. Some models have a plastic clip. You need to access these clips or bolts from inside the rear quarter panel. Either behind the interior trim on a coupe or behind the rear vent windows on the convertible. DO NOT JUST TRY TO PULL THEM OFF! They will BREAK! The 1999-2004 use a plastic clip, but it should still be removed from the inside.
A little bit about Greyhound Package Xpress shipping
February 6, 2014 | Posted in Helpful Tips, Shipping | By fastwrecks
Every so often, when listing large items, I indicate in the listings that the price is for Greyhound Package Xpress shipping. What is it? It’s a service that Greyhound offers, along with their well-known bus services. Packages under 72 inches long and 100 pounds or less are eligible for this service. The packages are placed in the cargo area, along with luggage, and are shipped to the customer’s closest bus terminal for pickup. Price is calculated by length, weight, and the distance it’s traveling. We drop off packages in Akron, Ohio quite a bit.
Why do I choose this? Sometimes, it’s the most economical way to ship large and/or heavy packages. While a Corvette bumper doesn’t weigh much, its nearly 6 feet in length, combined with its width, would cost $150-$200 to ship via FedEx or UPS, if the package is even within their accepted shipping dimensions. The $80 (or less) that we charge for shipping via Greyhound covers the cost of the shipping, plus the cost of the box, for less than half of what it is via common carrier.
I’ve been shipping with Greyhound for 6 years now, in addition to using other services. I have only ever had one major problem, which is the lowest percentage of error among all of the services I use.
What happens, though, is that sometimes customers purchase an item and don’t realize that 1) the package doesn’t come directly to your door, or 2) the closest terminal is not exactly close.
As far as #1 goes, there are a few options. Some locations (but not all) can offer door-to-door service for an additional fee. Customers can also ask for a shipping upgrade to FedEx or UPS, also for an additional fee. Please note that this does NOT include packages that are outside of the common carrier’s weight or dimensions limit.
For #2, my recommendation is to check the Greyhound Package Xpress website at http://www.shipgreyhound.com before buying. Find the closest terminal that is convenient to your home, job, or some other location. Call the number to verify that the location does, in fact, accept packages and has hours convenient to you. In some parts of the country, the closest terminal can be over an hour away. In other parts (like New York,) there is a wider selection of terminals, but some are easier to get to than others. It’s OK to express a preference as to where you want your package to go. However, if picking up a package won’t work for you, please keep in mind that I may or may not be able to ship a particular package by any other method.
This is Greyhound Package Xpress shipping in a rather long nutshell. I won’t throw you under the bus, but your packages will be there 🙂
It’s almost the New Year
December 30, 2011 | Posted in Helpful Tips, Uncategorized | By fastwrecks
As the new year approaches, I would like to thank each and every one of you for following our blog and other social media sites, and for buying from our Sports Car Salvage eBay store.
Your support has made many endeavors possible. We have been able to contribute to the Yellow Ribbon Fund via Ebay’s Giving Works program. Our summertime spoils added some vigor to Saturdays @ Schumann’s Roadside & Towing cruise-ins. Most recently, we were able to make Christmas happen for some who would otherwise have gotten little to nothing.
Click here to visit our Sports Car Salvage eBay store. If you are looking for items whose purchases contribute to the Yellow Ribbon Fund, look for the blue and yellow ribbon next to the eBay item title.
How to Remove your Headliner
November 14, 2011 | Posted in Helpful Tips, Mazda | By fastwrecks

A Mazda RX-7 GTU headliner, which can be found for sale in our eBay store.
After dealing with a handful of Corvettes and a convertible Miata, I had almost forgotten the joys of removing a headliner panel. Let’s face it, removing and replacing a large rectangular piece of pressed cardboard-type stuff covered with cloth is not exactly most people’s idea of fun. But here are some general tips:
First off, if you can find a video on YouTube depicting somebody working on the same car you are, all the better. I find online video guides very helpful when working on cars….that, and there isn’t always a Haynes manual at my disposal.
Make sure that any trim pieces holding the headliner in place have been removed first. Depending on the car, some have trim panels along the sides of the headliner that mount to the car and conceal a row of clips underneath. Others have corners underneath the A pillar trim pieces, which are often held in place by a combination of (often artfully concealed) screws and clips. Take off your sun visors and (if needed) the rear view mirror and interior light assembly.
Get a good idea of what is holding the headliner in place before jumping in with both feet….hands…whatever. I can’t tell you how many interior trim pieces I’ve seen utterly destroyed by the “When In Doubt, Just Yank Harder” approach. You may be dealing with hidden plastic clips a few inches apart, like on the backside of a door panel, plastic screws, or the like. A door panel removal tool and/or a flat-blade screwdriver will be helpful here. The key is to work with care and not get in a rush. We’re talking about a piece of pressed board here that (in some cases) is as big and awkward as your 6th grade science fair tri-fold poster.

Treat your headliner like one of these. Save the yanking and tugging for rusty undercarriage bolts!
You can give the headliner a gentle tug to get an idea of where it is still attached, but yanking with all of your might is a big no-no.
If you have a sunroof, you may have to remove a piece of trim, weather stripping, or something like it around the perimeter of the sunroof to complete the process. Then, go around the edges with a flat-blade screwdriver just to test the waters. If there aren’t any clips or screws, you may find that all you need to do is gently pry around the edges. Try this in a relatively inconspicuous place.
That’s it…the trick is to go slow, be careful, and NO YANKING!
**Science fair image courtesy of http://www.flickr.com/photos/oakleyoriginals/3229259616/